
티스토리 뷰
추후 내용 보완할 예정.
인터넷을 참고하였으나 최신 버전 및 오류를 고려하여 설치 과정을 수정했습니다.
서버: Ubuntu 22.04
Nginx 설치
As mentioned above, we’re going to be using the Nginx web server to run Nextcloud. Nextcloud requires a web server to function, and Nginx is the most popular open-source web server available today.
To install Nginx on Ubuntu, run the commands below:
sudo apt update
sudo apt install nginx
After installing Nginx, the commands below can stop, start and enable Nginx services to start up every time your server starts up.
sudo systemctl stop nginx.service
sudo systemctl start nginx.service
sudo systemctl enable nginx.service
MariaDB 설치
A database server is required for Nextcloud to function. Nextcloud stores its content in a database, and MariaDB is probably the best database server available to run Nextcloud.
MariaDB is fast, secure and the default server for almost all Linux servers. To install MariaDB, run the commands below:
sudo apt install mariadb-server
sudo apt install mariadb-client
After installing MariaDB, the commands below can stop, start and enable MariaDB services to start up when the server boots.
sudo systemctl stop mariadb.service
sudo systemctl start mariadb.service
sudo systemctl enable mariadb.service
Next, run the commands below to secure the database server with a root password if you were not prompted to do so during the installation.
sudo mysql_secure_installationWhen prompted, use the guide below to answer:
If you've just installed MariaDB, and haven't set the root password yet, you should just press enter here.

Enter current password for root (enter for none): PRESS ENTER

Switch to unix_socket authentication [Y/n] n

Change the root password? [Y/n] n

Remove anonymous users? [Y/n] y

Disallow root login remotely? [Y/n] y

Remove test database and access to it? [Y/n] y

Reload privilege tables now? [Y/n] y

All done!
To verify and validate that MariaDB is installed and working, log in to the database console using the commands below:
sudo mysql -u root -p
PHP 설치
Also, PHP is required to run Nextcloud. PHP packages are added to Ubuntu repositories. The versions of the repositories might not be the latest. If you need to install the latest versions, you’ll need to add a third-party PPA repository.
Run the commands below to a third-party repository with the latest versions of PHP.
sudo apt-get install software-properties-common
sudo add-apt-repository ppa:ondrej/php
sudo apt update
공식 설명서를 확인해보니 PHP 버전 8.1을 Recommend한다고 한다(7.4는 deprecated)
PHP는 안내한 사항 말고 새로 설치해야겠다. 아래 명령어 입력했다.
sudo apt install php8.1-fpm이거 먼저 하고
sudo apt install php8.1-fpm php8.1-imagick php8.1-common php8.1-mysql php8.1-gmp php8.1-imap php-json php8.1-pgsql php8.1-ssh2 php8.1-sqlite3 php8.1-ldap php8.1-curl php8.1-intl php8.1-mbstring php8.1-xmlrpc php8.1-gd php8.1-xml php8.1-cli php8.1-zip이걸로 추가 설치
다 됐으면 PHP config 파일 수정
sudo vi /etc/php/8.1/fpm/php.ini들어가서 아래 항목이 제대로 설정되어 있는지 확인하기
* vi 편집기에서 /를 사용하여 검색. 검색 시 항목 넘기기는 n(다음 항목), N(이전 항목)
file_uploads = On
allow_url_fopen = On
short_open_tag = On
memory_limit = 256M
upload_max_filesize = 100M
max_execution_time = 360
date.timezone = Asia/Seoul
Nextcloud 데이터베이스 설정
At this point, we’re ready to create the Nextcloud database. As mentioned above, Nextcloud uses databases to store its content.
To create a database for Nextcloud, run the commands below:
sudo mysql -u root -pThen create a database called nextcloud
CREATE DATABASE nextcloud;Next, create a database user called nextclouduser and set a password
CREATE USER 'nextclouduser'@'localhost' IDENTIFIED BY '[새로운 비밀번호]';Then grant the user full access to the database.
GRANT ALL ON nextcloud.* TO 'nextclouduser'@'localhost' WITH GRANT OPTION;Finally, save your changes and exit.
FLUSH PRIVILEGES;
EXIT;
Nextcloud 다운로드
We’re ready to download Nextcloud and begin configuring it. First, run the commands below to download the latest version of Nextcloud from its repository.
Next, extract the downloaded content into the Nginx root directory. This will create a folder called nextcloud.
nextcloud 최신버전 사용(230218 기준)
wget https://download.nextcloud.com/server/releases/nextcloud-25.0.3.zip -P /tmp
sudo unzip /tmp/nextcloud-25.0.3.zip -d /var/www/html
Then run the command below to allow the www-data user to own the new Nextcloud directory.
sudo chown -R www-data:www-data /var/www/html/nextcloud/
sudo chmod -R 755 /var/www/html/nextcloud/
nextcloud.conf 파일 수정
We have downloaded Nextcloud content into a new folder we called Nextcloud. Now, let’s configure Nginx to create a new server block to use with our Nextcloud website. You can create as many server blocks with Nginx.
To do that, run the commands below to create a new configuration file called nextcloud.conf in the /etc/nginx/sites-available/ directory to host our Nextcloud server block.
sudo vi /etc/nginx/sites-available/nextcloud.confIn the file, copy and paste the content below into the file and save.
upstream php-handler {
    server unix:/var/run/php/php8.1-fpm.sock;
}
server {
    listen 80;
    listen [::]:80;
    root /var/www/html;
    index  index.php index.html index.htm;
    server_name  [발급받은 도메인]


  location ^~ /nextcloud {

        client_max_body_size 512M;
        fastcgi_buffers 8 4K;
        fastcgi_ignore_headers X-Accel-Buffering;

        gzip off;

        error_page 403 /nextcloud/core/templates/403.php;
        error_page 404 /nextcloud/core/templates/404.php;

        location /nextcloud {
            rewrite ^ /nextcloud/index.php$uri;
        }

        location ~ ^/nextcloud/(?:build|tests|config|lib|3rdparty|templates|changelog|data)/ {
            return 404;
        }
        location ~ ^/nextcloud/(?:\.|autotest|occ|issue|indie|db_|console|core/skeleton/) {
            return 404;
        }
        location ~ ^/nextcloud/core/signature\.json {
            return 404;
        }

        location ~ ^/nextcloud/(?:index|remote|public|cron|core/ajax/update|status|ocs/v[12]|updater/.+|oc[sm]-provider/.+|core/templates/40[34])\.php(?:$|/) {
            fastcgi_split_path_info ^(.+\.php)(/.*)$;
            include fastcgi_params;
            fastcgi_param SCRIPT_FILENAME $document_root$fastcgi_script_name;
            fastcgi_param SCRIPT_NAME $fastcgi_script_name;
            fastcgi_param PATH_INFO $fastcgi_path_info;
            fastcgi_param modHeadersAvailable true;
            fastcgi_read_timeout 180;
            fastcgi_pass php-handler;
            fastcgi_intercept_errors on;
            fastcgi_request_buffering off;
        }

        location ~ ^/nextcloud/(?:updater|oc[sm]-provider)(?:$|/) {
            try_files $uri $uri/ =404;
            index index.php;
        }

        # Adding the cache control header for js and css files
        # Make sure it is BELOW the PHP block
        location ~ /nextcloud/.*\.(?:css|js) {
            try_files $uri /nextcloud/index.php$uri$is_args$args;
            add_header Cache-Control "max-age=15778463" always;
            add_header X-Content-Type-Options "nosniff" always;
            add_header X-Frame-Options "SAMEORIGIN" always;
            add_header X-XSS-Protection "1; mode=block" always;
            add_header X-Robots-Tag "none" always;
            add_header X-Download-Options "noopen" always;
            add_header X-Permitted-Cross-Domain-Policies "none" always;
            access_log off;
        }

        location ~ /nextcloud/.*\.(?:svg|gif|png|html|ttf|woff|ico|jpg|jpeg|map|json) {
            try_files $uri /nextcloud/index.php$uri$is_args$args;
            add_header Cache-Control "public, max-age=7200" always;
            access_log off;
        }
    }
}
Save the file and exit.
After saving the file above, run the commands below to enable the new file that contains our Nextcloud server block and other important Nginx modules.
심볼릭 링크 만들기
sudo ln -s /etc/nginx/sites-available/nextcloud.conf /etc/nginx/sites-enabled/
nginx 재시작
sudo systemctl restart nginx.serviceNow that Nextcloud is downloaded, and the necessary services are configured open your browser and start the Nextcloud installation by visiting your server’s domain name or IP address followed by /nextcloud :
http://[연결한 도메인]/nextcloud저는 포트가 안 열려 있어서 아래 명령어 입력했습니다.
sudo iptables -I INPUT 1 -p tcp --dport 80 -j ACCEPT
sudo iptables -I INPUT 1 -p tcp --dport 443 -j ACCEPT
sudo iptables --list
sudo systemctl restart nginx.service
However, we want to make sure our server is protected with Let’s Encrypt free SSL certificates. So, continue below to learn how to generate a Let’s Encrypt SSL certificate for websites.
Let’s Encrypt 적용하기
We have written a great post on generating and managing Let’s Encrypt SSL certificates for the Nginx web servers. You can use that post, to apply it here for your Nextcloud website.
How to install Certbot on Ubuntu Linux
Certbot is a command line tool that automates the tasks of acquiring and renewing Let’s Encrypt SSL certificates. There are other tools to perform the same tasks, but Certbot is efficient and easy to use.
To install Certbot on Ubuntu, run the commands below.
sudo apt update
sudo apt install certbot
How to generate Let’s Encrypt certificates for Ubuntu Linux
Now that Certbot is installed, you can begin generating Let’s Encrypt SSL certificates on Ubuntu Linux.
To automate the certificate generation and renewal, we’re going to use the Webroot plugin. This plugin uses the/.well-known/acme-challenge directory at the web server root to validate that the requested domain resolves to the server running Certbot.
We’re going to create a challenge/response configuration file to allow Let’s Encrypt to validate the server for which the certificates were generated.
To do that, run the commands below to create a configuration file called well-known.conf in the /etc/nginx/snippets directory. This directory contains all configurations you want to use with the Nginx web server. Make sure to include the challenge/response configuration file in all server blocks.
sudo nano /etc/nginx/snippets/well-known.confThen copy and paste the content below into the file and save it.
location ^~ /.well-known/acme-challenge/ {
  allow all;
  root /var/www/html/;
  default_type "text/plain";
  try_files $uri =404;
}
How to generate Dh (Diffie-Hellman) Group
Diffie–Hellman key exchange (DH) is a method of securely exchanging cryptographic keys. You’ll want to generate a strong Diffie-Hellman key group in most SSL configurations.
Run the commands below to generate a key in the /etc/ssl/cert directory on Ubuntu Linux.
sudo openssl dhparam -out /etc/ssl/certs/dhparam.pem 2048
How to obtain Let’s Encrypt certificates on Ubuntu Linux
At this point, you should be ready to obtain a free certificate from Let’s Encrypt. Before you generate your free certificates, run the commands below to enable the Nginx server block.
sudo ln -s /etc/nginx/sites-available/nextcloud.conf /etc/nginx/sites-enabled/Once complete, reload Nginx by running the commands below.
sudo systemctl restart nginx
webroot와 standalone 중에서 standalone으로 하기로 했다. 대신 nginx 멈춰야함
https://gomgomkim.tistory.com/47
sudo certbot certonly --standalone -d [연결한 도메인]
성공메세지
Successfully received certificate.
Certificate is saved at: /etc/letsencrypt/live/[연결한 도메인]/fullchain.pem
Key is saved at:         /etc/letsencrypt/live/[연결한 도메인]/privkey.pem
This certificate expires on 2023-05-19.
These files will be updated when the certificate renews.
Certbot has set up a scheduled task to automatically renew this certificate in the background.
default 파일 설정
/etc/nginx/sites-available/default아래 코드 넣어준다
server {
    listen 80;
    listen [::]:80;
    root /var/www/html;
    index  index.php index.html index.htm;
    server_name  [연결한 도메인];

    include snippets/well-known.conf;

    return 301 https://$host$request_uri;
}

server {
        listen 443 ssl default_server;
        listen [::]:443 ssl default_server;
        ssl_certificate /etc/letsencrypt/live/[연결한 도메인]/fullchain.pem;
        ssl_certificate_key /etc/letsencrypt/live/[연결한 도메인]/privkey.pem;
        ssl_trusted_certificate /etc/letsencrypt/live/[연결한 도메인]/chain.pem;

        root /var/www/html;

# Add index.php to the list if you are using PHP
        index index.html index.htm index.nginx-debian.html;

        server_name [연결한 도메인];

        include snippets/well-known.conf;

        location / {
# First attempt to serve request as file, then
# as directory, then fall back to displaying a 404.
                try_files $uri $uri/ =404;
        }
        location ~ [^/]\.php(/|$) {
                fastcgi_split_path_info ^(.+?\.php)(/.*)$;
                if (!-f $document_root$fastcgi_script_name) {
                        return 404;
                }

                fastcgi_pass unix:/run/php/php8.1-fpm.sock;
                fastcgi_index index.php;
                include fastcgi_params;
        }
        location ^~ /nextcloud {

                client_max_body_size 512M;
                fastcgi_buffers 8 4K;
                fastcgi_ignore_headers X-Accel-Buffering;

                gzip off;

                error_page 403 /nextcloud/core/templates/403.php;
                error_page 404 /nextcloud/core/templates/404.php;

                location /nextcloud {
                        rewrite ^ /nextcloud/index.php$uri;
                }

                location ~ ^/nextcloud/(?:build|tests|config|lib|3rdparty|templates|changelog|data)/ {
                        return 404;
                }
                location ~ ^/nextcloud/(?:\.|autotest|occ|issue|indie|db_|console|core/skeleton/) {
                        return 404;
                }
                location ~ ^/nextcloud/core/signature\.json {
                        return 404;
                }

                location ~ ^/nextcloud/(?:index|remote|public|cron|core/ajax/update|status|ocs/v[12]|updater/.+|oc[sm]-provider/.+|core/templates/40[34])\.php(?:$|/) {
                        fastcgi_split_path_info ^(.+\.php)(/.*)$;
                        include fastcgi_params;
                        fastcgi_param SCRIPT_FILENAME $document_root$fastcgi_script_name;
                        fastcgi_param SCRIPT_NAME $fastcgi_script_name;
                        fastcgi_param PATH_INFO $fastcgi_path_info;
                        fastcgi_param modHeadersAvailable true;
                        fastcgi_read_timeout 180;
                        fastcgi_pass php-handler;
                        fastcgi_intercept_errors on;
                        fastcgi_request_buffering off;
                }

                location ~ ^/nextcloud/(?:updater|oc[sm]-provider)(?:$|/) {
                        try_files $uri $uri/ =404;
                        index index.php;
                }

                # Adding the cache control header for js and css files
                # Make sure it is BELOW the PHP block
                location ~ /nextcloud/.*\.(?:css|js) {
                        try_files $uri /nextcloud/index.php$uri$is_args$args;
                        add_header Cache-Control "max-age=15778463" always;
                        add_header X-Content-Type-Options "nosniff" always;
                        add_header X-Frame-Options "SAMEORIGIN" always;
                        add_header X-XSS-Protection "1; mode=block" always;
                        add_header X-Robots-Tag "none" always;
                        add_header X-Permitted-Cross-Domain-Policies "none" always;
                        access_log off;
                }

                location ~ /nextcloud/.*\.(?:svg|gif|png|html|ttf|woff|ico|jpg|jpeg|map|json) {
                        try_files $uri /nextcloud/index.php$uri$is_args$args;
                        add_header Cache-Control "public, max-age=7200" always;
                        access_log off;
                }
        }
}
Save the file above, then restart Nginx and PHP using the commands below.
sudo systemctl reload nginxFinally, if everything went as planned, you should be able to start the Nextcloud setup wizard by browsing to the server hostname or IP address over HTTPS.
https://[연결한 도메인]/nextcloud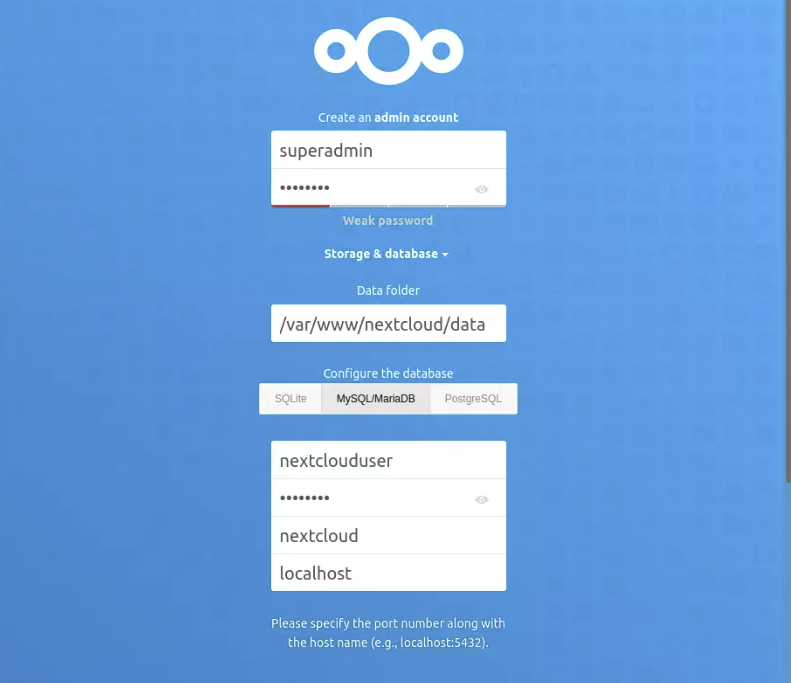
셋업해준다
인증서 자동 갱신 설정
스크립트 만들어준다.
cd /bin
sudo vi letsencrypt.sh
아래내용 추가
!/bin/sh
/etc/init.d/nginx stop
/usr/local/bin/certbot renew> /var/log/letsencrypt/le-renew.log
fuser -k 80/tcp
/etc/init.d/nginx start
이 자동 스크립트 파일에 권한을 부여합니다.
sudo chmod +x letsencrypt.sh
이어 크론탭을 열어 편집 상태로 만듭니다.
sudo crontab -e
아래처럼 일정 시간마다 이를 시행하라고 명령을 줍니다.
30 4 * * 0 letsencrypt.sh
저장하고 나와서는 크론을 다시 실행 시킵니다.
sudo service cron start
* 혹시 nextcloud 페이지 실행 시 php가 다운로드되는 현상이 나타나면 아래 링크 방법대로 해보기(2번만 하면 됨)
https://its-blog.tistory.com/152
참고링크
1. 전반적인 설치 과정: https://geekrewind.com/how-to-install-nextcloud-on-ubuntu-linux-with-nginx/
How to Install Nextcloud on Ubuntu Linux with Nginx
This post shows students and new users steps to install and configure Nextcloud on Ubuntu Linux with Nginx and Let’s Encrypt free SSL certificate. Nextcloud is a truly open source, self-host…
geekrewind.com
2. 포트열기: https://pythonblog.co.kr/blog/30/#gallery-5
30 오라클클라우드 80, 443포트 열기
https://www.oracle.com/kr/cloud/에 접속합니다. 오라클라우드 로그인 후 컴퓨트>인스턴
pythonblog.co.kr
3. 발급 방법 고민: https://gomgomkim.tistory.com/47
[Linux] Standalone으로 Let's Encrypt SSL 인증서 발급 받아 nginx에 적용하기
개요 1. https ssh 인증서 발급 이유 (추후 올릴 예정) 2. Let's Encrypt SSL 인증서 발급 방법 webroot 사이트 디렉토리 내에 인증서 유효성을 확인할 수 있는 파일을 업로드하여 인증서를 발급하는 방법 실
gomgomkim.tistory.com
23. 6. 9. 내용보완
위와 같은 과정으로 default 파일 적용 시
conflicting server name [발급받은 도메인] on "0.0.0.0:80", ignored라는 오류가 생긴다. 이는 config 파일이 충돌해서 발생한 문제이다.
/etc/nginx/sites-available/nextcloud.conf 파일의 line 9에 있는
server_name [발급받은 도메인]
을 삭제해주면 된다.
참고로 nginx 작동 중에 테스트 후 적용하려면
sudo nginx -tsudo service nginx reload위와 같이 해주면 된다.
'Server' 카테고리의 다른 글
| VSCode에서 SSH 사용하기 (0) | 2025.01.16 |
|---|---|
| Windows에서 ChatGPT로 Linux Terminal 사용하기 (0) | 2023.02.15 |
| Let's Encrypt 인증서 갱신 오류 해결하기(certbot renew 안 될 때) (0) | 2023.02.14 |
| [Azure] Microsoft Azure 활용하기 - Nextcloud 구축 / 도메인 연결 / 인증서 설치 (0) | 2021.03.17 |
| Ubuntu 서버에 NextCloud 설치 / 도메인 연결 / 인증서 설치 (0) | 2021.03.14 |